What is Nmap?
Nmap (“Network Mapper”) is a free, open source, network scanning tool.
Nmap is a widely used tool that can scan a network and identify the machines on the network, or can be used to scan an individual machine to find out useful info about that device such as; the operating system of the host (computer/device), the applications or services running on the machine and which ports are open for those services.
Disclaimer
Running the Nmap tool, or any network scanning tool, can be interpreted as illegal depending on local or country-specific laws. Please ensure you have permission to perform a scan of a network/device before beginning. If you just want to try Nmap out and follow along with this blog, performing scans on devices that are on your home network will work just fine. You can also use scanme.nmap.org so long as you abide by the restrictions mentioned on that web page.
Assumptions
There are a number of key technical terms and practices that will be covered which are listed here. All of the nmap commands shown in this post are done from within the command line (aka terminal).
- How to use the command line on Windows, Mac or Linux
- Installing Nmap
- What is an IP address?
- What is a port?
- A basic understanding of what a subnet is
- Knowledge of CIDR notation may be useful but not 100% necessary
Basic usage of Nmap
The most simple usage of Nmap is to scan one device’s IP address or website URL such as the following command:
nmap 45.33.32.156
# or
nmap scanme.nmap.org
This command will scan the IP address provided, checking the 1000 most common ports and will produce results showing which ports are open and what service is likely to be using that port. Check out this blog post to know more about which ports are scanned.
The output will look something like this:
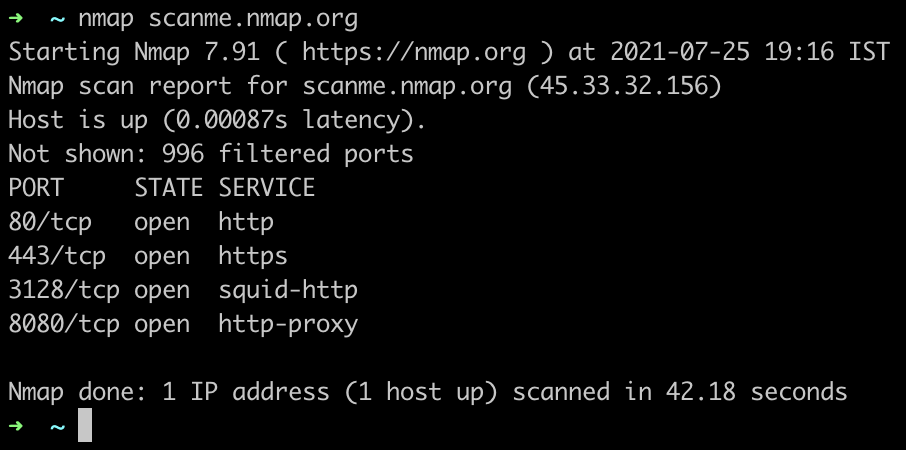
Interpreting the Results
While the output may look confusing at first, it doesn’t take long to understand how to pull out the useful information. The first four lines give some details about the scan, we can mostly ignore these lines to focus on the main content:
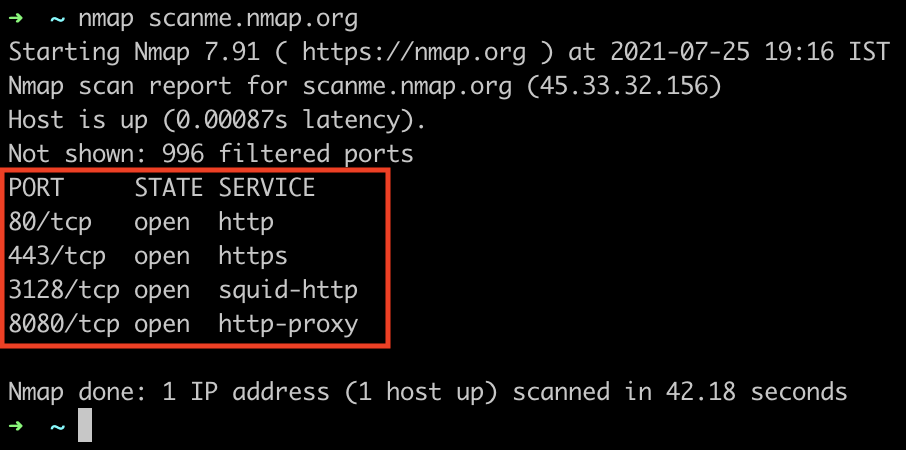
The results of our scan are displayed in three columns; port, state and service.
- PORT: gives us both the port number and the type of protocol that was found, TCP (Transfer Control Protocol) or UDP (User Datagram Protocol).
- STATE: lets us know if the port is open, filtered or unfiltered. (There are also two states for when Nmap isn’t sure if the port is open or closed AND filtered)
- SERVICE: gives us info on which service is most likely to be running on this port at the time (for example HTTP shown in the above screenshot)
This means that the above screenshot shows the website scanme.nmap.org with the IP address 45.33.32.156 has TCP ports 80, 443, 3128 and 8080 open.
What does that mean?
Ports 80 and 443 are used for HTTP and HTTPS respectively, which means this is a website as we can tell by going to the URL in our browser.
Port 3128 is often used by the squid-proxy service which is, unsurprisingly, a proxy, finally port 8080 is a HTTP proxy.
Scanning Multiple IP Addresses
Nmap also has a number of ways to scan multiple devices on a network, it can handle space-separated IP addresses, a range of addresses or CIDR notation.
# Scan these three space-separated IP addresses:
nmap 192.168.0.1 192.168.0.2 192.168.0.3

# Scan this range of IP addresses:
nmap 192.168.0.1-3

# Scan this block of IP addresses using CIDR notation
# (This will scan all addresses from 192.168.0.1 to 192.168.0.254):
nmap 192.168.0.0/24
Nmap Flags
Now that we know the basic usage and understand the results we can use different flags to make Nmap do many different things. We can get it to scan all 65535 ports, make it scan slower or faster or even get an idea of what operating system is running on the target device. To do this we add ‘flags’ to our nmap command.
Common Flags:
| Flag | Description |
|---|---|
| -A | Aggressive scan - “Enable OS detection, version detection, script scanning, and traceroute”. |
| -p 22 | Port number - specifies a port or list of ports (comma separated) to scan. |
| -p- | Scan all ports. |
| -T4 | Set a timing template - Sets how fast Nmap will perform the scan on the network, with values from 0-5. Zero and one are intended to bypass detection as they are so slow they may not be flagged by monitoring tools. If the T flag is not specified the default speed is 3 - ‘normal’. |
| -v | Verbose output - Prints more information about the scan while it is running, such as when an open port is found and an estimated completion time. |
| -sS | Stealth scan - Harder to detect as TCP connections are not completed with this flag specified. |
| -oN filename.txt | Normal output - Saves the scan results to an output text file. |
| -Pn | Stops Nmap sending pings to identify if a host is up or down. Sometimes hosts deliberately won’t respond to pings so this flag needs to be set. More info on this here. |
| -sC | Scripted scan - Runs a number of default scripts against a target to find info such as MAC address, listing discovered directories and fingerprinting usernames. |
| -sn | Ping scan - Pings the host(s) to see if they exist. |
| -sU | Perform a UDP scan. |
| –help | Nmap help - Displays useful information such as command syntax and a list of flags and options. |
Saving Results
It’s possible to save the output of an Nmap scan to a file. This is useful for various reasons; doing an official pentest on a company and need to keep detailed evidence of findings or you want to compare the results over time to see if specific ports have opened or closed recently. You may even want to create a script to interpret or process these results programmatically. Luckily Nmap has a number of different output types to choose from.
There are four main formats for nmap results; normal, XML, grepable and ‘all’:
nmap -oN output_filename.nmap scanme.nmap.org
nmap -oX output_filename.xml scanme.nmap.org
nmap -oG output_filename.gnmap scanme.nmap.org
nmap -oA output_filename scanme.nmap.org
-oN - Normal - saves the results to a file that looks almost identical to the results we see in the terminal, this is the most human readable output type.
-oX - XML - saves the output to XML format which can be easily parsed and used by various scripting languages. This format is often desired if you’re planning on writing a script that will do something with the scan results.
-oG - Grepable - saves the output so that it’s easily parsable by a number of common Unix command line tools such as grep, sed and awk. This is helpful if you’re wanting to write a quick script to pull out a specific field or check results.
-oA - All - saves the scan results in all three of the above formats which can be handy if you want to keep the results for later but are not sure how you’ll process them yet.
Use Nmap to Find all Devices on a Network
There is no single, completely accurate way to find all devices on a network, there will always be caveats and situations where certain devices might be missed, however Nmap can give us a good rough estimate of what hosts are available and discoverable.
As mentioned in the Scanning Multiple IP Addresses section we can use CIDR notation to scan a block/range of IP addresses, this is generally the easiest method when attempting to find all devices.
To get our rough estimate of devices on a network we can check all IPs from 192.168.0.1 to 192.168.0.254 using the following command with the -sn flag:
nmap -sn 192.168.0.0/24This command will ping all devices in that IP range and output a list of the hosts that returned a response. According to this stackexchange post if the ping fails Nmap will attempt to send SYN packages to the device on port 80. Unfortunately neither of these methods are a guaranteed way to see if a device definitely exists or doesn’t since the device may be configured both to not respond to pings and to not respond to SYN requests on port 80.
If you need an absolutely definitive list of hosts you can omit the -sn flag and scan the 1000 most common ports of every IP, specify certain ports or even add the -p- flag and scan all ports of every IP, but any of these will take a very long to complete and might not be very useful unless you’re doing full internal network discovery for a pentest or professional engagement.
Common Flags for Routine Usage
There are two main variations of the Nmap command that would be my go-to commands when using this tool; A quick scan of the most common ports and a full scan of all ports including OS detection.
The quick scan is for when I want to know if a machine has ports such as 8080 or 22 open etc. The ‘full’ scan command was mostly what I used when working as a pentester, I’d kick off the scan to check all ports and find the operating system because even though this usually takes a good 10 mins to complete the info was very useful for identifying services to attack.
These two commands are:
# Quick scan of the common ports
nmap scanme.nmap.org

# 'Full' scan of all the ports with OS detection etc
nmap -p- -A scanme.nmap.org
Note: The -Pn flag may need added if the target machine doesn’t respond to pings, but the good news is that Nmap generally shows a message mentioning this if that’s the case.
Further Reading
If you’re wanting to learn more about Nmap, advanced usage or more about port scanning these links might be helpful: